
We'll create something like this using only Unity Free Assets
Unity recently released it's long-awaited and much improved UI system in version 4.6. Prior to this, Unity's ability to create GUI's was lackluster, many developers turned to Asset Store extensions like NGUI to give themselves a fighting chance. With the arrival of the new UI system, have our troubles finally been put to rest? Well let's take a look...
Create a New Project in 3D, import the Terrain Assets and Tree Creator packages.... Once your scene is ready create a Canvas.

The Canvas is a GameObject which controls the display of all the UI components.

To improve the sharpness of the buttons, you may want to check Pixel Perfect on the Canvas component.
With the Canvas selected, create 3 Buttons from the same UI menu that we just used. These buttons must be children of the Canvas GameObject in order for them to be displayed on the screen.
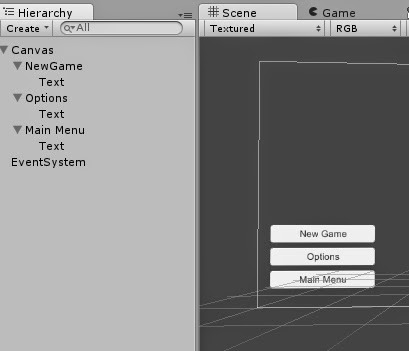
For this example we will create the buttons as shown above. Each button has a child called Text that controls the text that is displayed on the button.
 Go into each of these Text objects and change the text field in the Inspector.
Next let's create a C# script to control the functionality of our menu. Name it UIManager and attach it to the Canvas GameObject.
using UnityEngine;
using System.Collections;

        public class UIManager : MonoBehaviour {
 public MenuCam menuCam;
 public GameObject NewGameButton;
 public GameObject OptionsButton;
 public GameObject ReturnToMenuBtn;
 private UIScreen currentScreen;
 // Use this for initialization
 void Start () {
  currentScreen = UIScreen.MainMenu;
 }

 // Update is called once per frame
 void Update () {
  //Enable buttons for main menu only
  if(currentScreen == UIScreen.MainMenu)
  {
   NewGameButton.SetActive(true);
   OptionsButton.SetActive(true);
   ReturnToMenuBtn.SetActive(false);
  }
  else if(currentScreen == UIScreen.Options)
  {
   NewGameButton.SetActive(false);
   OptionsButton.SetActive(false);
   ReturnToMenuBtn.SetActive(true);

  }

 }
 public void OptionsButtonClicked()
 {

  if (menuCam)
  {
   menuCam.OptionsScreen ();
   currentScreen = UIScreen.Options;
  }
 }
 public void MenuButtonClicked()
 {

  if (menuCam)
  {
   menuCam.MenuScreen ();
   currentScreen = UIScreen.MainMenu;
  }
 }
 public void NewGameButtonClicked()
 {
  Application.LoadLevel ("Scene2");
 }
}
public enum UIScreen
{
 MainMenu,
 Options

}
We will keep track of the screen we are on by using a UIScreen enum that includes two values, MainMenu and Options. This can easily be expanded upon later if you want to have more UIScreens. In the Update function we check to see which screen we are on and toggle on or off the visibility of the buttons that should be on that screen. So when we are on the MainMenu screen, we want to see the New Game and Options buttons, but not the Return to Main Menu button. This is a simple approach that can easily be expanded on for more buttons. The ButtonClicked functions are called when the corresponding button is clicked and will control which screen we are looking at. They will call a function in the MenuCam script which we will get into a little later.
Notice that we have made a public GameObject definition for each button at the top of the script. You will need to drag the appropriate GameObject into the fields of the script. The script will use these to toggle the display of the buttons.

Here we have added the buttons we made into the UIManager script

For each Button you will need to go to the On Click() section and add the Canvas GameObject into the available field. We will then be presented with the available functions that can be called by clicking the button. For the New Game button we will choose the GoToLevel1 function.

For the Options button

For the Menu button
At this point the majority of our UI function is in place, we will just be adding some things to our scene to make an interesting background for our menu. Let's start by adding a terrain from the GameObject menu at the top.

Use the terrain tools to paint some mountains

Add a texture and paint it onto the ground, since we have imported the Terrain Assets package, some should be available

Add some trees to the scene as you see fit

You should end up with something like this, though you can customize it to however you like
Using the GameObject menu, add a Camera to your scene and two Empty GameObjects. This Camera will be used to render the Terrain we just created as a background to our UI menus.

Place your Camera so the view looks something like this. I'm trying to give the impression that the player is standing in a forest, so I will place the camera ground level close to the trees. I also had to change the Field Of View setting on my Camera to a value of 20 to improve the appearance.
Now we will name our empty GameObjects, MenuPos and OptionsPos. These will be objects that mark the place of the Camera, we will make a script to control the Camera's movement between these two points to add some action to our menu. Place the MenuPos object at the same location as the Camera.

To do this you can Copy and Paste the Position from the Camera to the MenuPos
The OptionsPos GameObject should be placed at a location of your choosing. When the Options Button is pressed, the Camera will move from the MenuPos to the OptionsPos. Let's add the script to make the Camera move, to do this create a new C# script and name it MenuCam. Copy in the following code:
using UnityEngine;
using System.Collections;

public class MenuCam : MonoBehaviour {
 public Transform MenuPos;
 public Transform OptionsPos;
 private float overTime = 1.5f;

 public void OptionsScreen()
 {
  StartCoroutine (MoveToOptions());

 }
 public void MenuScreen()
 {
  StartCoroutine (MoveToMenu());

 }
 private IEnumerator MoveToOptions()
 {

  Vector3 source = MenuPos.position;
  Vector3 target = OptionsPos.position;
  float startTime = Time.time;
  while(Time.time < startTime + overTime)
  {

   transform.position = Vector3.Lerp(source, target, (Time.time - startTime)/overTime);
   yield return new WaitForEndOfFrame();
  }
  transform.position = target;
 }

 private IEnumerator MoveToMenu()
 {
  Vector3 source = OptionsPos.position;
  Vector3 target = MenuPos.position;
  float startTime = Time.time;
  while(Time.time < startTime + overTime)
  {
   transform.position = Vector3.Lerp(source, target, (Time.time - startTime)/overTime);
   yield return new WaitForEndOfFrame();
  }
  transform.position = target;
 }

}
The MenuCam script must be attached to our Camera; it will move the position of the Camera when it receives a function call from the UIManager in either the OptionsScreen() or MenuScreen() functions. These functions will start a coroutine that will move our camera from once place to another using the Lerp function. Lerp is short for linear interpolation, it's use here is simple, we give it the starting position and the destination position and a step size. Using the WaitForEndOfFrame() function, we use Lerp to tell us what the next position we need to move to is in order to get to our destination, once per frame. When we are on the Main Menu screen, that position is the MenuPos and when we are in the Options Menu it's OptionsPos.

Add the MenuCam script to the Camera GameObject, drag the MenuPos and OptionsPos GameObjects from our scene into the fields as shown here

Now we have a Camera we can place in the appropriate field of the UIManager script
Now if you hit play, you should be able to click the Options Menu and have the Camera move to it's new position, the New Game and Options buttons should then disappear.

Main Menu

Options Menu
The New Game button won't work yet, we must first add a new Scene to the project which can be transitioned to. In the UIManager script, I'm telling Unity to load "Scene2", for the purpose of this example you will either need a Scene with that name added to your build settings or change the name to one of your own Scenes.

When the New Game Button is clicked, we will try to load "Scene2"
Let's make a blank scene so we can try out the New Game button functionality. Don't forget to save the scene we are working in right now!


Create a new scene and name it Scene2

Open the Build Settings dialogue under the File menu at the top left. Click the Add Current button, this will allow us to go between scenes.
After you've saved the new scene, go back to your original scene, and hit play. New when you hit the New Game button, you should transition to the new scene. If you encounter problems here, make sure you have followed all the steps and the name of your new scene matches what we have in the UIManager NewGameButtonClicked() function.
At this point we have a bare-bones, functional Main Menu. It could use a lot of work to improve the appearance. You would probably want to use custom art that fits your game better than the Unity Standard Assets, but this will work for demonstration purposes.
The following are a few things you can do to improve the appearance of our Main Menu:
The following are a few things you can do to improve the appearance of our Main Menu:

Change the appearance of your buttons by playing with different fonts, colors or shapes

Add text or other buttons from the GameObject menu.

Use Particle Systems and Point Lights to create atmosphere. Use a Directional Light with Hard Shadows turned on to add shadows.

Increase the Billboard Start, Detail Distance, Fade Length of the Tree & Detail section of the Terrain. This will improve their interaction with your lighting. Be careful, these can quickly hurt performance resulting in low frame rates.

Thanks for reading, if you found it helpful, or have any suggestions please feel free to comment.
Adam Buckner from Unity provided some nice feedback on the strategy used for the UI. He recommends that separate functions are created for Enabling or Disabling the UI. This is beneficial because then we don't need to continue Activating/De-Activating every Update frame. For more detail you can see the thread here:
ReplyDeletehttp://forum.unity3d.com/threads/tutorial-making-a-main-menu-with-unitys-new-ui.286712/